Final Game

Having successfully completed all parts of the Zombie tutorials (green, yellow, red) I decided I wanted to extend what I did much further and refine the features which shown to me and go above class material. I will go on to talk about what advanced I made and the reasoning behind that.

How I went above class material

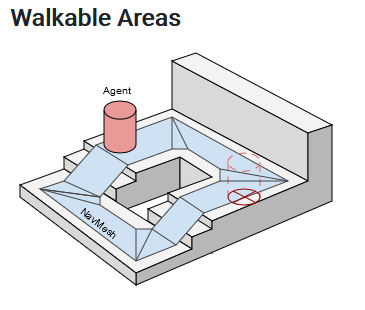
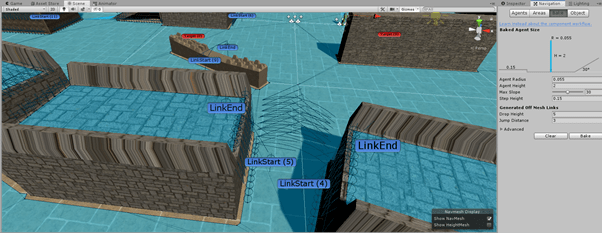
Advanced nav mesh – I wanted to extend the navmesh capabilities in what was shown to me within the tutorial a lot further because in majority of games the environment is much more complex and I wanted to make sure my AI could perform well in a lot of situations. I decided to play much more with the parameters of the navmesh to create areas with slopes and which required more advanced techniques. As you can in the image below I have created areas which can be walked up, so the correct slop and step up parameters were required, it was also required to be set as “walkable” instead of “static”.

Offmesh links – These are an advanced feature of unity’s navmesh and they allow me to incorporate navigation shortcuts which cannot be represented using a walkable surface. For example, jumping over a fence, jumping from one platform to another etc. the reason I implemented this was because I wanted my AI to be more robust and be able to follow the player in any way because otherwise it would be entirely possible for the player to just jump on raised ground and just cheat. The lines you see from one area to another is to represent where the agent will jump to. I also had to manually implement offmesh link components on an empty game object because Unity’s auto baking of offmesh links only allows for agents to jump across or down, not jump upwards or over obstacles, therefore I had to create my own which would allow the AI to climb up area (this is denoted by the labels “LinkStart” and “LinkEnd”)
Spawning of Enemies – During the tutorial I was shown how to spawn zombies however I felt it was rather basic and I felt it did not work as a real game would (as it just spawned x amount at the start of them game), so to further improve this extended the script to work based off a timer so enemies would be constantly spawning in order to keep the player aware and I also allowed the script to take an array of spawn points and enemy prefabs so it will randomly spawn enemies in random locations. This will allow for more dynamic scaling if the game will be enhanced.

Enhanced FNSM – During the zombie tutorial I was only introduced to using 3 states; Wandering, Chasing and Dead. I then decided to enhance this further by implementing two more states; Attacking and Fleeing.

Attacking – This is an extension of chasing, this is required because it would not be very realistic if the player could not be attacked. In order to do this I created a separate attack script which would be called within the state machine and allow for the player to be damaged. (This will be shown within the video) It works by checking whether the player is within a capsule collider and then proceeds to damage the player which matches with the attacking animation and attack speed. Upon the players health reaching 0 the player will die, and the game will restart after x amount of seconds (I created a script to start coroutine when players health reaches 0).

Fleeing – The other state I decided to add was fleeing, this is important in AI as sometimes we want the enemy to run away and recover before launching another attack on the player, this adds more realism because usually people don’t just attack until they die but flee in certain situations. So in order to solve this problem I checked for when the AI reaches < 35hp, they will then switch to the fleeing state, within this state it works out the vector distance to the player and then if the player is within a fleeing range (float value e.g. 3f) the AI will then proceed to run away by working out the distance to player and then adding that to its current position which will give a new position for the AI to move (think like two spheres pushing each other apart and the centres being the player and AI agent). However the AI would not flee forever but for 5 seconds, once this time is over I then created a “lookAt” method to rotate the AI to the player so they could then go and attack the player again but if they couldn’t see the player they would change back into the Wandering state. (e.g. if AI moved out of line of sight)


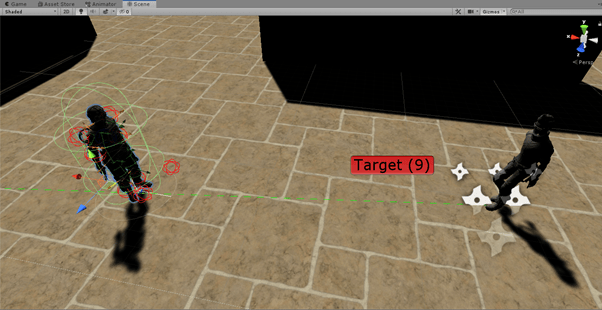
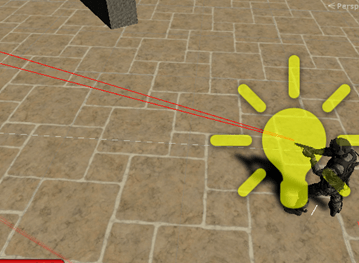
I also extended the aggro detection method of the AI by creating a new method called “InAggroRange” which works the same way as working out the distance to player just like within the fleeing state however I am using it in the opposite way to detect the player. Now that I have created this additional detection method within the state machine the AI within wandering state now searches for the player by using the “CanSeePlayer” method (used in tutorial) OR “InAggroRange”. I created this additional method because it was very easy for the player to just jump over or quickly move behind the enemy and then the AI could no longer detect the player which is very unrealistic. The lines in the image below are gizmos which are used to represent how these two methods are searching for the player.

Health System – I also decided to add a health system which works for both the player and AI, they both work very similarly in that they have a “takeDamage” and “Die” functions and the health is lowered in the same way (amount of damage taken is variable), however the player on death will trigger an animation but the AI will change to the dead state which will trigger the ragdoll effect. I decided to create this because it makes the game much more enjoyable to play as hitting an enemy / player once and then dying is not very fun. I also created a helper script which was used to display the health of the player. This works by utilizing unity’s UI system and changes the value of a label in run time so the player can always see how much health they have.

Player attacking – In the zombie tutorial it showed me how to attack / kill an enemy using melee attacks by using a collider on the fist of the player but I wanted to extend combat further so I decided to change the players attack to shooting using a gun. This was somewhat complicated at first, but I quickly understood how to do this correctly. I first had to add the gun model to hand of player by making it a child of the hand, this would then mimic the parents transform position and rotation. I then also got a shooting animation from Mixamo to replace the boxing one from the tutorials.

To create the gun working correctly I created an empty game object on the pistol which would serve as the “gunBarrelEnd” I then proceeded to add a light (muzzle flash), particle effect (bullet firing) and line renderer (line renderer would not work as intended and shot in an incorrect location), I then created a script which worked by firing a ray from the game object forward and then if the ray then collided with the enemy it would return hit information which I then use to cause the enemy to take damage, to tune this further I also enabled and disabled the light, particle effect and line renderer during the appropriate times. I also incorporated an attack speed for the player as it would be unrealistic if the player could fire constantly if the left mouse button is down, so by making use of a timer and delta time then I could fix this issue.
Conclusion

Overall I think that assignment 1 has gone very well. I have completed all parts of the zombie tutorial which I found very intellectually stimulating in pushing my knowledge further which allowed me to enhance it further to make the gameplay much more interesting, I feel I was able to make the AI much more intelligent and robust in majority of situations by going beyond course material and the AI could travel around the environment very well (as I designed my environment as an obstacle course to test AI capabilities). Of course, with anything I do believe there can be improvements, and these will be addressed within the future if I decide to create the same styled game for assignment 2. All improvements are small fine-tuning issues.

I do have some navmesh issues which I could not solve, this is more of an aesthetic issue but still can affect gameplay. Sometimes when the AI is too close to a wall / ramp it is trying to traverse it will change into the crouching state in the animation and they would stay like this until they move away from the wall / ramp. I did try removing this animation, but I quickly realised it was required when AI would jump to places using off-mesh links as the crouching was used for the falling impact also.

Next, when the player shoots if the fire point of the weapon is already within the collider of the enemy (such as when the zombie is in melee range and attacking) then the ray cast does not register as it colliding with the enemies collider therefore not working, I believe there is a way around this problem such as really fine tuning the size of the collider / fire point to get it perfectly so they never overlap.

References

HardwarePal. (2020). Best CPU For Gaming – 9 Processors And 8 Games Tested – HardwarePal. [online] Available at: http://www.hardwarepal.com/best-cpu-gaming-9-processors-8-games-tested/ [Accessed 18 Feb. 2020].

Orland, K. (2020). Left 4 Dead’s developers are Back 4 Blood with new spiritual successor. [online] Ars Technica. Available at: https://arstechnica.com/gaming/2019/03/left-4-deads-developers-are-back-4-blood-with-new-spiritual-successor/ [Accessed 18 Feb. 2020].

Pinterest. (2020). Image result for raycasting unity | Game mechanics, Chart, Image. [online] Available at: https://www.pinterest.co.uk/pin/731272058218593427/ [Accessed 18 Feb. 2020].

Reichert, C. (2020). Google’s DeepMind turns to StarCraft II after conquering Go | ZDNet. [online] ZDNet. Available at: https://www.zdnet.com/article/googles-deepmind-turns-to-starcraft-ii-after-conquering-go/ [Accessed 18 Feb. 2020].

Spiralgraphics.biz. (2020). Spiral Graphics – Free Tiling Texture Materials. [online] Available at: http://spiralgraphics.biz/packs/ [Accessed 18 Feb. 2020].

Wiki.unity3d.com. (2020). MouseOrbitImproved – Unify Community Wiki. [online] Available at: https://wiki.unity3d.com/index.php/MouseOrbitImproved [Accessed 18 Feb. 2020].

Week 4

Zombie tutorial

During this tutorial I was finishing things off with the tutorial, this week I completed all sections (green, orange & red).

This was the final week of zombie tutorial and the main part was to create random spawning. Firstly, I decided to clean up the editor by creating an empty game object which would then store all subsequent spawned zombies as children, this is to make life more organised and easier for myself because if I spawned 50 zombies It would be bad practise to clutter up the editor.

I then created a “SpawnZombies” script which would be the helper script to constantly instantiate zombies to keep the game flowing. This works by creating in several variables; numberOfZombies, allWaypoints, ZombiePrefab. This would then find the game objects with the relevant tags (“Waypoint” & “Zombie”) to ensure we get the correct game object associated with it.

Next, in the update I created a counter to store the amount of zombies currently existing, then we compare that value to the numberOfZombies and if it is less than the amount I want I then proceed to instantiate the zombie prefab at a random waypoint location. I intend in the future to extend the spawn zombie script to take in more prefabs and spawn locations to increase the randomness of zombie spawning to be more enjoyable. Once this was all finished I then continued to texture all of my assets to polish my game more. I do intend to extend all AI features much further, I will then go on to talk about how I went further within than what was taught in the tutorial in my final blog post about my final game. I will clearly state what extra has been changed / improved and implemented and support that

Lab 4 – Inital concept for coursework 2

I feel that from following the zombie tutorial I have gained a good solid understanding from AI and I feel that it has allowed me to explore new AI techniques in which I intend to implement in Assignment 2.

I will be keeping the same genre in which I will create my game as I want to expand much further, it will be still be a third person shooter, and will perhaps vary from zombies but I feel that by implementing zombie behaviour will allow for showcasing of more advanced AI techniques. Games such as Left 4 Dead 2 & World War Z have great examples of these and do it very well, I am hoping to implement;

Flocking – This behaviour is usually shown with animals such as birds or sheep where many individuals act as one whole unit, I intend to implement this with zombies and create hordes of wandering AI and also allowing for other AI agents to join this horde when getting within a certain range, this has great game design aspects as it gives a randomness affect to gameplay as hordes will always vary.

Sensors – This behaviour refers to sound sensors within majority of stealth games. AI would be much more sophisticated if they have the ability to “hear” things and adds another depth of immersion and challenge for the player as it can feel unrealistic if you are hiding behind a wall firing a gun into the air and no zombie reacts.

Various state machines – I also want to add much more variation between zombies this will include mixture between ranged and melee enemies with emphasis on abilities, this will result in more sophisticated state machines. By implementing spells / abilities it will also allow for much in depth combat AI system. This will include fuzzy logic to figure out probabilities to whether for example an AI agent will auto attack or start to run away to start casting a spell / ability.

Week 3

Zombie tutorial

During this tutorial I was finishing the character state machine within Unity, this week I completed all sections (green, orange & red).

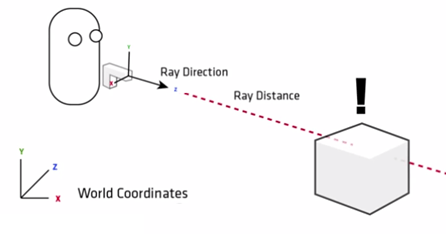
First, I started by implementing the AI to chase the player. There are different ways to achieve this such as using a sphere collider to detect when player is in range, sensors to detect sounds etc. but the tutorial covers a way by detecting the player by using a ray cast (shoots a ray from a point to a surface to detect intersections). To implement this I created a method called “CanSeePlayer()” and also changed the tag on the player to “Player” this is required as we only want the ray to detect the player and nothing else.

The function worked by looking straight ahead of the AI character but in a 90 degree arc so this mimics real field of view perception. I then checked if the ray cast hits the player and if so then the function returns true (AI can see player), so then it then changes the state from wandering to chasing and will walk towards player. Also to keep the chasing state simple for now we revert the state back to wandering if “CanSeePlayer()” is false, this way the states can freely transition between each other correctly. I also added an debug draw ray so which is shown by the green line; this helped me with debugging to see if the AI was detecting the player as intended.

Next, was to implement the dead state which would effectively end the finite state machine of the AI. I setup a new method called “kill()” which would transition to the dead state, but to make this work correctly I had to setup a few things in the editor first. I would not use a death animation but instead a ragdoll effect which also simulates death as lifelessness such as a doll, I then created a ragdoll on the zombie and then dragged the relevant joints of the zombie into each section, once created I made sure that they were all enabled as “isKinematic” to disable the ragdoll on start and disabled each joints collider as this could incur unexpected results as I found out.

Inside the AI script it’s important that I disable things such as Animatior, NavMeshAgent, Scripts, Rigidbody and colliders etc. this is because the zombie is now dead and no longer serving a purpose so we clean up everything so no strange bugs start to happen with the AI and then destroy the zombie after some time.

The final thing to do was to kill the zombie during the shooting animation. I added an empty game object to where the gun barrel end would be placed and then fired a ray from this location forward. In the “HitEnemy” script I make a reference to the enemy’s script so I can call the kill method here, it then checks if the object it is hitting is a zombie with the relevant tag and then uses a “isShooting” bool to prevent the zombie from dying when just walking into the players gun so only when the player is shooting can the zombie be killed.

The final part of the tutorial was to texture the environments, I have done this process many times before and is simply done by creating a material and adding an image texture and effecting the tiling options to make it fit correctly, then applying the material to the game object.

Lab 3 – Problems within AI

AI is the main driving point of a good majority of games, whether this is in terms of racing games to MMORPG. However, as with anything this comes with its own set of issues / problems as everyone wants to have the best AI within their games.

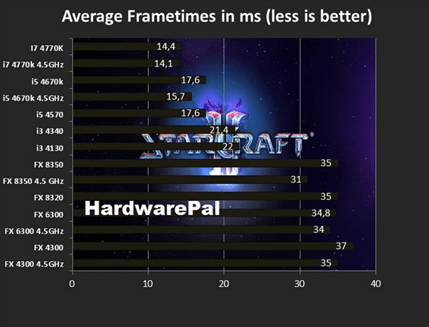
CPU time – Notorious heavy AI games such as StarCraft or any RTS game take a massive amount of CPU time as all the calculations required such as A* pathfinding  to make the game interesting and fun are very expensive, and more AI means more CPU time. This was previously a large issue as there was a trade of between rendering and AI and depending on the game one side would be favoured more, but as technology is improving such as multithreading and GPU’s, GPU’S have now taken over the rendering this means more CPU is now available to the developers so they can create much more complex interesting and fun AI for the player.

Fun vs the best AI – Even though machine learning algorithms have been around for many years we have only recently been able to implement them due to the computational strain they have on computers and now have been shown to be incredibly effective in learning games and have even beaten grandmasters in games like chess in record time which has led to them quitting the game for ever.

However, in games we don’t always want the best AI because if the player finds it impossible to win then it ruins the immersion and the enjoyability of the game. In fact, such games like Dark souls require the player to learn how the AI works in order to beat the game and failure to do so will lead to them dying many times, in most games AI is usually slightly “dumb” in order to give the player a chance but being too dumb just gets boring and this is where difficulty levels have been used to keep the game fun and interesting for all skill levels of players.

This leads to issues between developers in finding a “middle ground” of AI in which it is constantly fun, immersive and challenging to the player (not just repeating same tactic over and over) so the player will never get bored. Also, even though machine learning algorithms is very advanced AI, and has been shown to work in games, the question is will it take over the AI that we used to, to give us a new innovative experience.

Week 2

Zombie Tutorial

During this tutorial I was introduced to character control with state machine in Unity, this week I completed all sections (green, orange & red).

I did not need to complete the “Changing AI character’s target with a script” section as I completed the amber section last week.

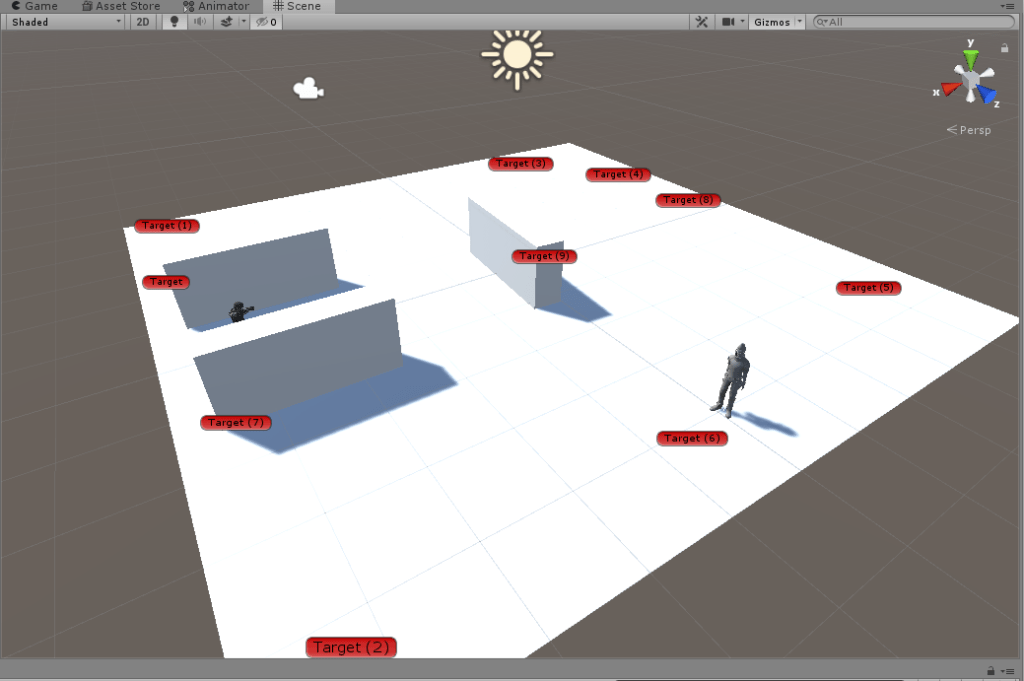
So I went on and started by changing the behaviour of the AI controller to work with just wandering around the environment (chasing and attacking the player will come later on in the tutorial), there are many different ways to achieve this goal like in very in-depth games but for this tutorial it was focused on using empty game objects as waypoints to walk from each point going through each in the list (+1 each time). The script would know that these are as we would attach a tag to them (“Waypoint”) and then this tag is then looked for by the script, this ensures that no other object in the world could potentially affect the AI movement. I placed 10 waypoints around the environment in a sequence so the AI could easily just “wander” around its environment.

I extended the AI character controller to incorporate this new behaviour; it works by when starting it will create a new variable to store all game objects with tag “Waypoint” then if the character is in wandering state it would set its current target to the next waypoint in the array / list. Once it reaches that target it will then go to the next one and so on.

This is good for some AI however, players tend to quickly learn patterns to its important to have them random in some way so instead I decided to randomize the next waypoint the AI chose, this gives it a more re-playable effect so it engages the player to think more creatively on how to avoid the target instead of just boringly learning the pattern.

Next, I then chose a new character which I found from Mixamo, I have used this before so it was very straight forward to change the character, and I chose a new character and then replaced the Ethan character. I did have to have to change the materials to opaque as the imported model came as transparent and also change the rig type to humanoid, I just reused the running animation which came from third person controller to make my model move as normal.

For the final part I then went back to Mixamo and found a fighting animation to use and imported it. I then opened up the animator controller which I was using and created a new state which would serve as my “Shooting” state. I created a new bool parameter (isShooting) which would be used for animation within a script, I made two transitions one to the “Grounded” state and one from the “Grounded” state and this was indicate the transitions to and from movements. I then used the “isBoxing” parameter on this transitions to control whether or not it should play the shootinganimation. Finally, I created a small script which would go on the player which store the animator controller component and then set the “isShooting” parameter to true if the player pressed the “b” key.

Lab Task – Movement & Pathfinding

How Unity works under the hood

Navigational meshes (NavMesh) are used in majority of games especially the ones using AI and this is something that will be used and refined within my Zombie game.

Unity uses A* algorithm; this is a graph traversal and path search algorithm, this efficiently plots a walkable path on a map with many obstacles and works out a path from points A to B using nodes. Inside unity it works by the walkable areas by a series of convex polygons. Convex polygons are useful as we know that there are no obstructions between any two points inside a polygon.

For an agent to be able to follow the path the AI will reach the destination by always steering towards the next visible polygon (corridor). However in my zombie game it will have many agents so to deal with this they need to deviate from the original path when avoiding each other to get smooth realistic movement.

What I think the performance factors are

For navmesh calculations within a game of one agent is not that computationally intensive however, once you start to have many agents such as 50+ then this can lower frame rate significantly if not properly optimized. Imagine you have one agent updating itself 120 times a second (120FPS for example) then once you have that 120 * 50 (50 agents) = 6000 then you can understand why it slows down performance as the algorithm has to work the new position 6000 times per second and generally A* is not the most efficient algorithm but works the best in games. To avoid this you could instead cut the amount of times you update to maybe once per second or half a second, usually if done correctly the player won’t notice this and will lead to much better performance.

Cases you can think of the AI might struggle with

Finally, it’s known that players like to cheat and test the AI to see what exploits they can get away with, I personally have done this and it usually happens when the player jumps up onto a higher location where they start attacking AI NPC however, the agent is unable to traverse the nav mesh to them. So this is a big issue within games and preventing players from doing this is usually a big priority, a way to get around this issue is by teleporting the NPC to the player if the NPC is not able to reach them.

Week 1

Zombie Tutorial

During this tutorial I was introduced to basic movement AI navigation in Unity, this week I completed all sections (green, orange & red).

I began by importing the standard assets into the scene and then setting up an environment, which consisted of a quad and some cubes which would later act as obstacles to test the nav mesh agent. It is important that I select these objects and make them “navigation static” this is self-explanatory but it just makes sure that in no way that it can be moved by things such as physics forces so it will effectively “never move”. Also I looked at changing the parameters of the bake to best suit my environment, however the default options were already perfect for this simple environment as it is just a flat area with simple geometry obstacles.

Next, I added two characters to my scene; Third person controller and AI third person controller. I then attached the main camera to the third person controller by making it a child, this would ensure that the camera follows the player always when navigating around the environment.

For the AI third person controller I placed it in the way of a few obstacles to test the AI could work correctly and as intended. Next, I created an empty game object (which only has a transform position) and placed this into the “target” part of the AI character control script, this is used to make the AI walk from its starting location to its desired location. Having tested this with several different variations of obstacles in the way I know that this is working correctly.

Finally, I decided to change the AI’s target position with a script; I thought this was important to learn as this is the same way click to move isometric games work. The way I achieved this was by using the same concept of before (by having a target) but instead of using a game object which would clog up the hierarchy. I would use a ray cast from the camera to mouse position which would return a vector transformation which can be used by the AI, whenever the player would left click somewhere then that position would be set to the target position for the AI, resulting in good solid movement of the AI using mouse clicks.

Lab 1

Predator Prey – This works by having a rigid hill terrain and the AI is a large group of NPC’s using the flocking method this simulates herd animals such as “sheep”. They wander round as a group which provides more realism. The other AI acts as a “Wolf” and also wanders around until a sheep comes into range then chases it and kills it. While the rest of the sheep flee and reform and flock together.

Body Guards – This AI is used for a protection scenario, the AI (3 NPCS) follows the player in a triangle formation while looking outwards from the player. They then also rotate to look at / point gun at 5 different points which makes it look like they are on guard.

Also as the player moves so does the AI constantly adjust their position to stay in this formation, I believe the AI’s position is worked out by using an offset from the players position and fixing that so it cannot change, this makes sure they always maintain their formation.

Left 4 Dead 2

I have spent many hours playing this game and have always noticed that every time I play the experience navigating through the environment is always different, I never find that the same enemies are placed in the same location and hordes, special zombies etc. always seem very dynamic. Having read interviews from AI directors from Left 4 Dead it was mentioned that they focused heavily on managing the pace, it builds up to the intensity until it peaks and a horde arrives, then eases off, this build up and ease off is repeated throughout the level as players get to exit. It does this by modelling stress levels in players (affected by things like; zombies in proximity, health levels, ammo and close vs ranged combat), once monitored the system adjusts how the zombies attack like where they come from, how many attack and which types.

The hoard system adds a lot of more dynamics in that players need to be ready at any time otherwise they run the risk of dying. However, once playing for a little time it is very easy to understand how to predict the hordes of zombies such as tunnelling into one small area which forces the zombies to funnel through and get killed very easily, I think start to realise that the zombies AI is quite dumb and lacks intelligence as it’s too easy for the player to predict how the zombies will act.

Create your own website, free on WordPress.com.Create your own website.
Start free