Having successfully completed all parts of the Zombie tutorials (green, yellow, red) I decided I wanted to extend what I did much further and refine the features which shown to me and go above class material. I will go on to talk about what advanced I made and the reasoning behind that.
How I went above class material
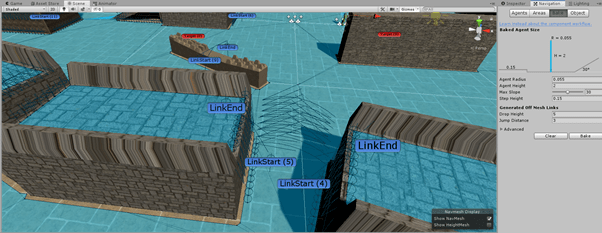
Advanced nav mesh – I wanted to extend the navmesh capabilities in what was shown to me within the tutorial a lot further because in majority of games the environment is much more complex and I wanted to make sure my AI could perform well in a lot of situations. I decided to play much more with the parameters of the navmesh to create areas with slopes and which required more advanced techniques. As you can in the image below I have created areas which can be walked up, so the correct slop and step up parameters were required, it was also required to be set as “walkable” instead of “static”.

Offmesh links – These are an advanced feature of unity’s navmesh and they allow me to incorporate navigation shortcuts which cannot be represented using a walkable surface. For example, jumping over a fence, jumping from one platform to another etc. the reason I implemented this was because I wanted my AI to be more robust and be able to follow the player in any way because otherwise it would be entirely possible for the player to just jump on raised ground and just cheat. The lines you see from one area to another is to represent where the agent will jump to. I also had to manually implement offmesh link components on an empty game object because Unity’s auto baking of offmesh links only allows for agents to jump across or down, not jump upwards or over obstacles, therefore I had to create my own which would allow the AI to climb up area (this is denoted by the labels “LinkStart” and “LinkEnd”)
Spawning of Enemies – During the tutorial I was shown how to spawn zombies however I felt it was rather basic and I felt it did not work as a real game would (as it just spawned x amount at the start of them game), so to further improve this extended the script to work based off a timer so enemies would be constantly spawning in order to keep the player aware and I also allowed the script to take an array of spawn points and enemy prefabs so it will randomly spawn enemies in random locations. This will allow for more dynamic scaling if the game will be enhanced.

Enhanced FNSM – During the zombie tutorial I was only introduced to using 3 states; Wandering, Chasing and Dead. I then decided to enhance this further by implementing two more states; Attacking and Fleeing.
Attacking – This is an extension of chasing, this is required because it would not be very realistic if the player could not be attacked. In order to do this I created a separate attack script which would be called within the state machine and allow for the player to be damaged. (This will be shown within the video) It works by checking whether the player is within a capsule collider and then proceeds to damage the player which matches with the attacking animation and attack speed. Upon the players health reaching 0 the player will die, and the game will restart after x amount of seconds (I created a script to start coroutine when players health reaches 0).
Fleeing – The other state I decided to add was fleeing, this is important in AI as sometimes we want the enemy to run away and recover before launching another attack on the player, this adds more realism because usually people don’t just attack until they die but flee in certain situations. So in order to solve this problem I checked for when the AI reaches < 35hp, they will then switch to the fleeing state, within this state it works out the vector distance to the player and then if the player is within a fleeing range (float value e.g. 3f) the AI will then proceed to run away by working out the distance to player and then adding that to its current position which will give a new position for the AI to move (think like two spheres pushing each other apart and the centres being the player and AI agent). However the AI would not flee forever but for 5 seconds, once this time is over I then created a “lookAt” method to rotate the AI to the player so they could then go and attack the player again but if they couldn’t see the player they would change back into the Wandering state. (e.g. if AI moved out of line of sight)


I also extended the aggro detection method of the AI by creating a new method called “InAggroRange” which works the same way as working out the distance to player just like within the fleeing state however I am using it in the opposite way to detect the player. Now that I have created this additional detection method within the state machine the AI within wandering state now searches for the player by using the “CanSeePlayer” method (used in tutorial) OR “InAggroRange”. I created this additional method because it was very easy for the player to just jump over or quickly move behind the enemy and then the AI could no longer detect the player which is very unrealistic. The lines in the image below are gizmos which are used to represent how these two methods are searching for the player.

Health System – I also decided to add a health system which works for both the player and AI, they both work very similarly in that they have a “takeDamage” and “Die” functions and the health is lowered in the same way (amount of damage taken is variable), however the player on death will trigger an animation but the AI will change to the dead state which will trigger the ragdoll effect. I decided to create this because it makes the game much more enjoyable to play as hitting an enemy / player once and then dying is not very fun. I also created a helper script which was used to display the health of the player. This works by utilizing unity’s UI system and changes the value of a label in run time so the player can always see how much health they have.

Player attacking – In the zombie tutorial it showed me how to attack / kill an enemy using melee attacks by using a collider on the fist of the player but I wanted to extend combat further so I decided to change the players attack to shooting using a gun. This was somewhat complicated at first, but I quickly understood how to do this correctly. I first had to add the gun model to hand of player by making it a child of the hand, this would then mimic the parents transform position and rotation. I then also got a shooting animation from Mixamo to replace the boxing one from the tutorials.
To create the gun working correctly I created an empty game object on the pistol which would serve as the “gunBarrelEnd” I then proceeded to add a light (muzzle flash), particle effect (bullet firing) and line renderer (line renderer would not work as intended and shot in an incorrect location), I then created a script which worked by firing a ray from the game object forward and then if the ray then collided with the enemy it would return hit information which I then use to cause the enemy to take damage, to tune this further I also enabled and disabled the light, particle effect and line renderer during the appropriate times. I also incorporated an attack speed for the player as it would be unrealistic if the player could fire constantly if the left mouse button is down, so by making use of a timer and delta time then I could fix this issue.

Conclusion
Overall I think that assignment 1 has gone very well. I have completed all parts of the zombie tutorial which I found very intellectually stimulating in pushing my knowledge further which allowed me to enhance it further to make the gameplay much more interesting, I feel I was able to make the AI much more intelligent and robust in majority of situations by going beyond course material and the AI could travel around the environment very well (as I designed my environment as an obstacle course to test AI capabilities). Of course, with anything I do believe there can be improvements, and these will be addressed within the future if I decide to create the same styled game for assignment 2. All improvements are small fine-tuning issues.
I do have some navmesh issues which I could not solve, this is more of an aesthetic issue but still can affect gameplay. Sometimes when the AI is too close to a wall / ramp it is trying to traverse it will change into the crouching state in the animation and they would stay like this until they move away from the wall / ramp. I did try removing this animation, but I quickly realised it was required when AI would jump to places using off-mesh links as the crouching was used for the falling impact also.
Next, when the player shoots if the fire point of the weapon is already within the collider of the enemy (such as when the zombie is in melee range and attacking) then the ray cast does not register as it colliding with the enemies collider therefore not working, I believe there is a way around this problem such as really fine tuning the size of the collider / fire point to get it perfectly so they never overlap.
References
HardwarePal. (2020). Best CPU For Gaming – 9 Processors And 8 Games Tested – HardwarePal. [online] Available at: http://www.hardwarepal.com/best-cpu-gaming-9-processors-8-games-tested/ [Accessed 18 Feb. 2020].
Orland, K. (2020). Left 4 Dead’s developers are Back 4 Blood with new spiritual successor. [online] Ars Technica. Available at: https://arstechnica.com/gaming/2019/03/left-4-deads-developers-are-back-4-blood-with-new-spiritual-successor/ [Accessed 18 Feb. 2020].
Pinterest. (2020). Image result for raycasting unity | Game mechanics, Chart, Image. [online] Available at: https://www.pinterest.co.uk/pin/731272058218593427/ [Accessed 18 Feb. 2020].
Reichert, C. (2020). Google’s DeepMind turns to StarCraft II after conquering Go | ZDNet. [online] ZDNet. Available at: https://www.zdnet.com/article/googles-deepmind-turns-to-starcraft-ii-after-conquering-go/ [Accessed 18 Feb. 2020].
Spiralgraphics.biz. (2020). Spiral Graphics – Free Tiling Texture Materials. [online] Available at: http://spiralgraphics.biz/packs/ [Accessed 18 Feb. 2020].
Wiki.unity3d.com. (2020). MouseOrbitImproved – Unify Community Wiki. [online] Available at: https://wiki.unity3d.com/index.php/MouseOrbitImproved [Accessed 18 Feb. 2020].
